[SSL/https] Let's Encrypte 도입
Let's Encrypt 란
SSL/TLS의 암호화통신을 이용한 증명서를 발급하는 인증기관(CA:Certificate Authority)중 하나이다.
웹사이트를 안전하게 공개하기 위한 SSL적용하기 위한 무료로 이용가능한 Let's Encrypt를 사용
인터넷상에서 통신을 보호하기 위한 보안정책으로 SSL(Secure Sockets Layer)/TLS(Transport Layer) 을 이용한 암호화
장점 및 목적
- 누구나 오픈으로 사용할 수 있다.
- 자유롭게 사용할 수 있다.
- 증명서의 서명을 자동화 할 수 있다.
- 전문적인 지식없이도 누구나 https를 사용할 수 있게 한는것이 목적이다.
자동증명서 발급원리
도메인 유효성을 확인하기 위해 외부에서 서버에 접근할 수 없으면 증명서를 발급할 수 없는 구조 (ACME Protocol)를 채택하고 있다.
이러한 구조로 인해 자동적이고 빠른 증명서 발급이 가능하다.
Let's Encrypt 다운로드
증명서를 발급받기 전에 먼저 유효한 도메인과 인증을 받을 서버가 존재해야 한다.
certbot install
certbot는 Let's Encrypt가 제공하는 클라이언트 소프트웨어로 SSL증명서 취득과 갱신을 자동화 할 수 있다.
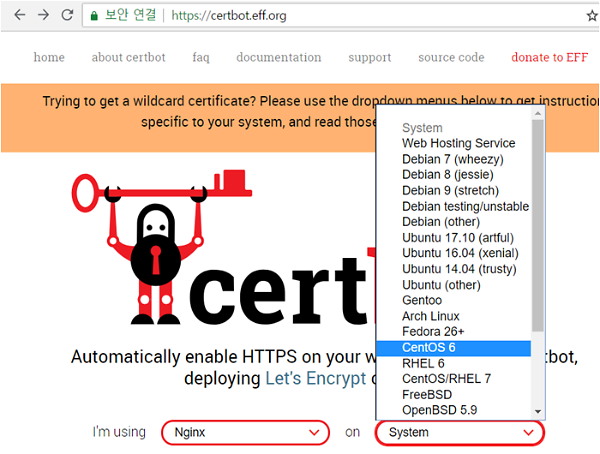
다운로드는 페이지를 참조 ▶▶https://certbot.err.org◀◀
홈페이지에 들어가 대상 웹서버와 시스템을 선택한다.

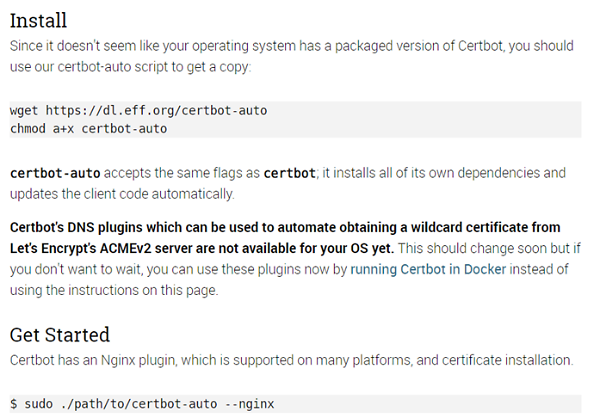
다운로드 URL을 확인한다.

서버에 다운로드 받을 디렉토리 생성 및 다운
다운 URL은 위 참조
# mkdir /mylets
# cd /mylets
# wget https://dl.eff.org/certbot-auto
# chmod a+x certbot-auto
SSL인증서 취득
Let's Encrypt로 인증서를 취득할려면 도메인과 웹서버가 필요하다.
웹서버는 도큐멘트루트에 엑세스권한이 있어야 한다. (URL로 접근가)
Nginx사용
기존 운영중인 서버일 경우, 인증서를 받기위한 작업을 위해 Nginx의 도큐멘트 루트를 Nginx에서 직접 엑세스 할 수 있게 설정한다.
예로 tomcat등과 같은 WAS와 연동설정한걸 일단 해제
# vi {nginx_home}/conf/nginx.conf 설치시 지정한 설정파일 편집
server_name 과 location/root 설정
server {
listen 80;
server_name emunhi.com;
client_max_body_size 20M;
#charset koi8-r;
#access_log logs/host.access.log main;
location / {
root /www/docroot;
#index index.html index.htm;
}
}
Nginx를 재기동 후 아래 명령실행
동의와 메일송신수락에 관련된 메세지가 나오면 A , Y 를 선택후 엔터하면 된다.
관련된 의존 라이브러리가 없으면 자동으로 다운로드 하면서 진행하므로 시간이 걸릴수 있다.
# ./certbot-auto certonly --webroot -w /www/docroot -d emunhi.com --email
정상적으로 완료되면 아래와 같은 메세지가 나온다.
IMPORTANT NOTES:
- Congratulations! Your certificate and chain have been saved at:
/etc/letsencrypt/live/emunhi.com/fullchain.pem
Your key file has been saved at:
/etc/letsencrypt/live/emunhi.com/privkey.pem
Your cert will expire on 2018-11-16. To obtain a new or tweaked
version of this certificate in the future, simply run certbot-auto
again. To non-interactively renew *all* of your certificates, run
"certbot-auto renew"
- If you like Certbot, please consider supporting our work by:
Donating to ISRG / Let's Encrypt: https://letsencrypt.org/donate
Donating to EFF: https://eff.org/donate-le
[root@emunhi:/mylets]#
SSL 인증서 Nginx에 적용
# vi {nginx_home}/conf/nginx.conf 설치시 지정한 설정파일 편집
server {
#listen 80;
listen 443 ssl;
server_name emunhi.com;
ssl_certificate /etc/letsencrypt/live/emunhi.com/cert.pem;
ssl_certificate_key /etc/letsencrypt/live/emunhi.com/privkey.pem;
client_max_body_size 20M;
#charset koi8-r;
#access_log logs/host.access.log main;
location / {
root /www/docroot;
#index index.html index.htm;
}
}
설정파일을 변경했으면 nginx를 재기동후 확인해 본다.
https://emunhi.com
Apache httpd를 운영중이면 해당 키를 적용해도 무관
HTTP의 모든 요청을 HTTPS로 리다이렉트하기(nginx)
여기 참조 : ▶▶Nginx Http to Https◀◀
인증서 자동갱신 설정
crontab에 자동갱신 및 서버 재기동을 등록한다.
crontab가 없을 경우 설치 ▶▶crontab install◀◀
아래 파란부분은 예로 매일 1시정각에 갱신하는 설정
# crontab -e
0 1 * * * certbot-auto renew --post-hook "systemctl restart nginx" 1 > /dev/null 2 > /dev/null
0 1 * * * /soft/lets/.../certbot-auto renew --force-renew --post-hook "service nginx restart" 1 > /dev/null 2 > /dev/null
주기설정
* * * * *
분(0-59) 시간(0-23) 일(1-31) 월(1-12) 요일(0-7)
2,4,6,8,10,12월 1일 0시에
0 1 1 2,4,6,8,10,12 * certbot-auto renew --post-hook "service nginx restart" 1 > /dev/null 2 > /dev/null
인증서 갱신 테스트
자동갱신 설정에 앞서 실제 갱신이 정상적으로 실행되는지를 테스트해본다.
# ./certbot-auto renew --dry-run
--dry-run : 실제로 동작하진 않는다. 동작확인을 위한 시뮬레이션만 한다.
--force-renew : 유효기간이 1개월 미만이 아니더라도 강제적으로 유효기간을 갱신한다.
유효기간의 확인
브라우저에서 확인 또는, openssl 커맨드를 사용해 확인할 수 있다.
# openssl x509 -in /etc/letsencrypt/live/emunhi.com/cert.pem -noout -dates
notBefore=Aug 18 03:04:23 2018 GMT
notAfter=Nov 16 03:04:23 2018 GMT
notBefore 는 증명서의 생성일시
notAfter 는 증명서의 유효기간을 뜻한다.
인증서 갱신 및 확인
certbot-auto renew --force-renew --post-hook "systemctl restart nginx"
아래에서 갱신 전/후 의 인증서를 비교해 보면 xx1.pem 에서 xx2.pem 으로 변경된 걸 볼수 있다.
# cd /etc/letsencrypt/live/emunhi.com/
# ll
total 4
lrwxrwxrwx 1 root root 34 Aug 18 13:02 cert.pem -> ../../archive/emunhi.com/cert1.pem
lrwxrwxrwx 1 root root 35 Aug 18 13:02 chain.pem -> ../../archive/emunhi.com/chain1.pem
lrwxrwxrwx 1 root root 39 Aug 18 13:02 fullchain.pem -> ../../archive/emunhi.com/fullchain1.pem
lrwxrwxrwx 1 root root 37 Aug 18 13:02 privkey.pem -> ../../archive/emunhi.com/privkey1.pem
-rw-r--r-- 1 root root 682 Aug 18 13:02 README
# /mylets/certbot-auto renew --force-renew --post-hook "systemctl restart nginx"
# ll
total 4
lrwxrwxrwx 1 root root 34 Aug 18 15:26 cert.pem -> ../../archive/emunhi.com/cert2.pem
lrwxrwxrwx 1 root root 35 Aug 18 15:26 chain.pem -> ../../archive/emunhi.com/chain2.pem
lrwxrwxrwx 1 root root 39 Aug 18 15:26 fullchain.pem -> ../../archive/emunhi.com/fullchain2.pem
lrwxrwxrwx 1 root root 37 Aug 18 15:26 privkey.pem -> ../../archive/emunhi.com/privkey2.pem
-rw-r--r-- 1 root root 682 Aug 18 13:02 README